Defects
User Guide
SaaSMap
1. Introduction
Defects in SaaSMap are the formal record of a problem found during testing or in production. A Defect captures what went wrong, how severe it is, who should fix it, and how it was resolved — creating an auditable trail from discovery through to closure.
This guide explains how to create, manage, triage, and resolve Defects within a project. It is written for test managers, developers, testers, and project managers who work with the Defects module.
What you can do with Defects
- View and search all defects for a project in List, Card, or Board (Kanban) view.
- Create defects manually or with AI assistance.
- Log defects directly from a failed test step during test execution.
- Assign defects to team members and set priority, severity, and due date.
- Link defects to the test cases and requirements they relate to.
- Manage resolution and document fix details with AI-assisted suggestions.
- Track the full change history of a defect through the Activity Stream.
- Bulk update status, priority, severity, or assignee across multiple defects.
- Import and export defects using Excel or ZIP files.
2. Accessing Defects
Defects are managed at Project level.
- Sign in to SaaSMap and open Home.
- Select the project you are working on.
- In the project workspace, click the Defects tab.
Note: Everything on this tab applies only to the project you have open. If you do not have permission to view Defects, the tab may not be visible.

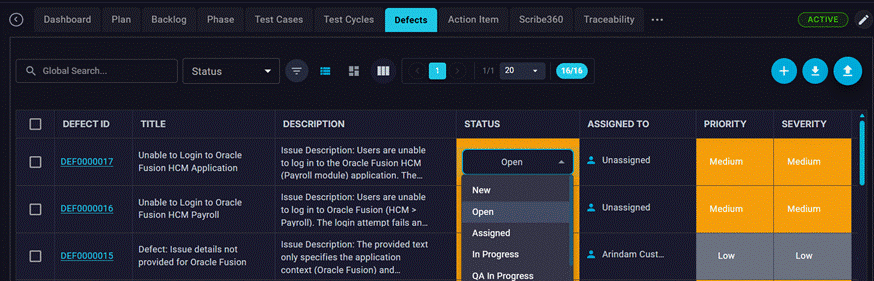
3. The Defects Screen
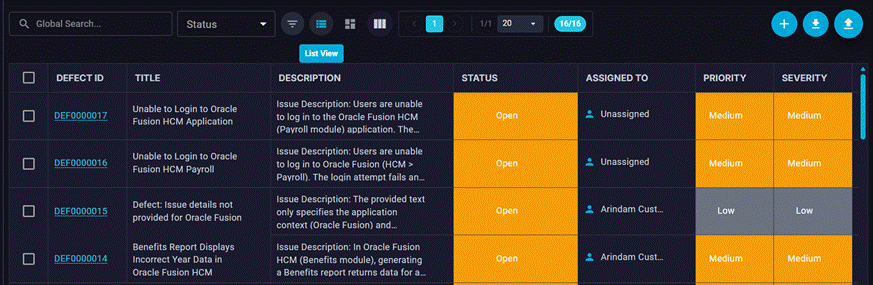
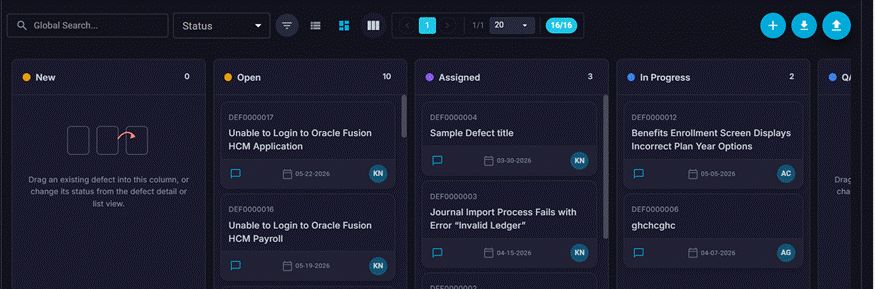
The Defects screen lists all defects for the current project. Use the view selector on the toolbar to switch between List, Card, and Board views.
List View
Displays defects in a sortable, filterable table — best for scanning large numbers of defects quickly.
Board View (Kanban)
Displays defects as cards organised into columns by status. Drag and drop a defect card between columns to change its status. Ideal for triage and sprint-style workflows.
Columns you will see (List View)
| Column | What it means |
| Defect ID | Unique identifier automatically assigned (e.g. DEF0000001). |
| Title | Short description of the defect. |
| Description | Defect Description |
| Status | Current lifecycle status (e.g. New, In Progress, Fixed, Closed). |
| Priority | Business urgency: Low, Medium, High, or Critical. |
| Severity | Technical impact: Minor, Major, Critical, or Blocker. |
| Assigned To | Team member responsible for fixing the defect. |
| Test Case | Test case in which the defect was found (if applicable). |
| Requirements | Requirement the defect relates to (if applicable). |
| Mode | How the defect was created: Manual or AI. |
| Due Date | Target resolution date. |
| Created By / Date | Who logged the defect and when. |
Note: Custom fields configured by your administrator (up to five additional fields) may also appear as columns. Use the Columns selector on the toolbar to show or hide them.
Row actions menu
Open the options menu (⋮) on any row for common actions:
- View / Edit comments — open the comments page.
- Delete — permanently remove the defect (subject to role permissions). Defects with a linked Test Case cannot be deleted.
Search and Filters
- Global Search — type keywords and press Enter to search across defect ID, title, and description.
- Status Filter — quick-select one or more lifecycle statuses.
- Priority Filter — narrow the list by priority.
- Severity Filter — narrow the list by severity.
- Advanced Filters — build rules on any field: Defect ID, Title, Description, Status, Priority, Severity, Test Case, Requirement ID, Assigned To, Created By, Created Date, Due Date, Mode, and any custom fields. Combine rules with AND or OR.
Note: Active filters appear as chips above the list. Click the × on a chip to remove that filter. Your filter choices are preserved during the session.
4. Defect Status
Every defect moves through a lifecycle controlled by the project configuration. The statuses below represent the common set; your administrator may add or rename statuses.
| Status | Typical meaning |
| New | Defect has just been logged and not yet reviewed. |
| Open | Defect has been reviewed and accepted for fixing. |
| Assigned | Defect has been assigned and has a owner. |
| In Progress | A developer is actively working on the fix. Could be QA in Progress or SR in Progress if assigned for verification or Service Request creation. |
| Fixed | The fix has been applied and is awaiting verification. |
| Verified | The fix has been verified and ready for closure. |
| On Hold | Its currently pending. |
| Reopened | Testing showed the fix was insufficient; defect is active again. |
| Closed | Defect is verified and closed. No further action required. |
Note: Closing a defect may require a Resolution to be saved first. If a resolution is mandatory for your project and is missing, you will be prompted to add one before the status change is confirmed.
5. Creating a Defect
There are three ways to log a defect in SaaSMap:
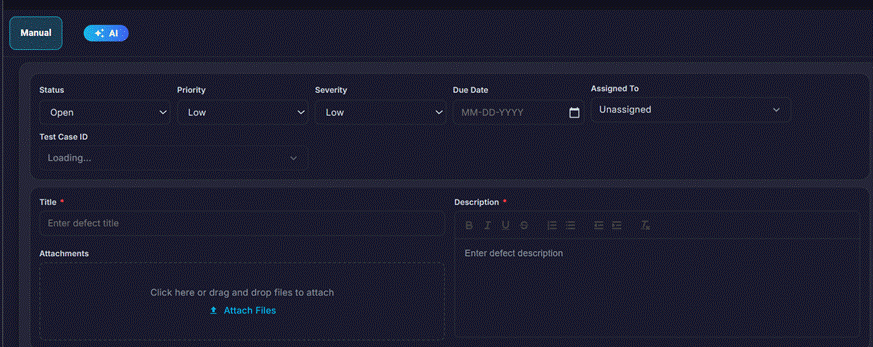
5.1 Manually from the Defects tab
- Click the + (Add Defect) button on the toolbar.
- Select Manual on the creation form.
- Fill in the required fields — Title is mandatory.
- Set Status, Priority, Severity, Assigned To, and Due Date as appropriate.
- Optionally link the defect to a Test Case and / or Requirement.
- Click Save to create the defect.
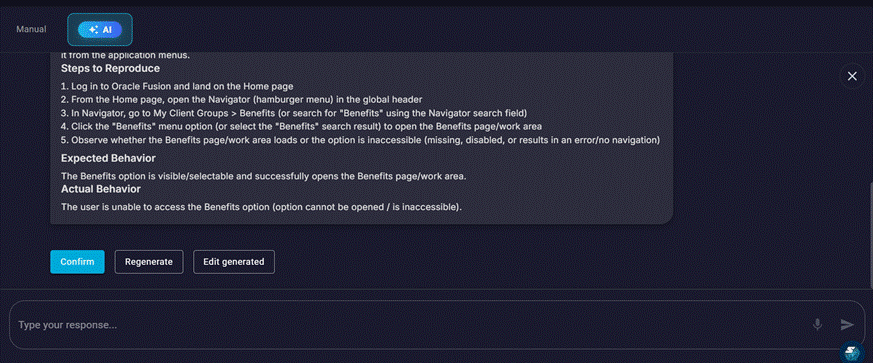
5.2 With AI assistance
When AI is enabled for your tenant, the AI tab on the creation form can draft the defect content based on a short description you provide.
- Click + (Add Defect) and select the AI tab.
- Describe the problem in the prompt field.
- Click Generate. Review the AI-drafted title and description.
- Adjust the content as needed, then click Save.
Note: AI-created defects are labelled with Mode: AI. If AI is disabled for your tenant, the AI tab will not be available.
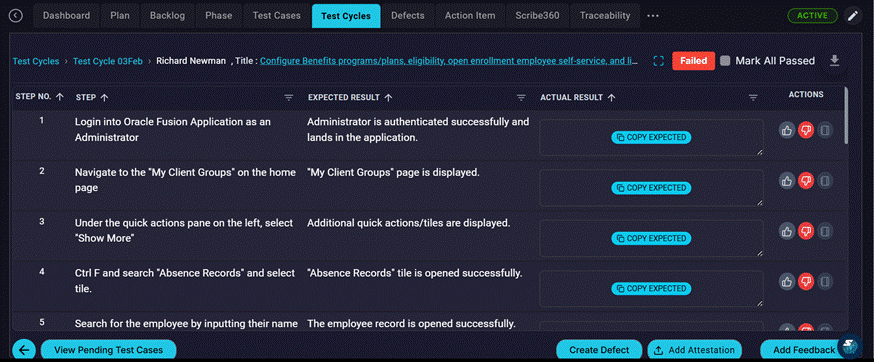
5.3 Directly from a failed test step
While executing a test case in a Test Cycle, testers can log a defect without leaving the execution view.
- Mark a test step as Failed.
- Click Log Defect in the execution panel.
- Complete the defect form — the test case link is pre-filled.
- Save the defect. It appears immediately in the Defects list.
Note: If your project requires mandatory defect creation for failed steps, you will not be able to move past the step until a defect is logged.
6. The Defect Detail Page
Click any defect row (or select View from the row menu) to open the full detail page. The page is organised into tabs:
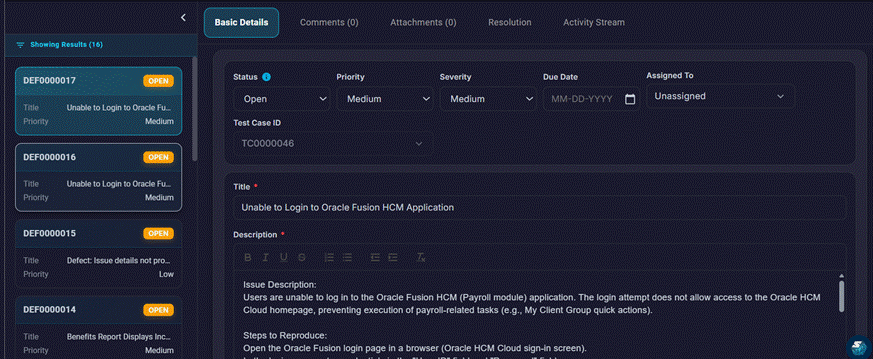
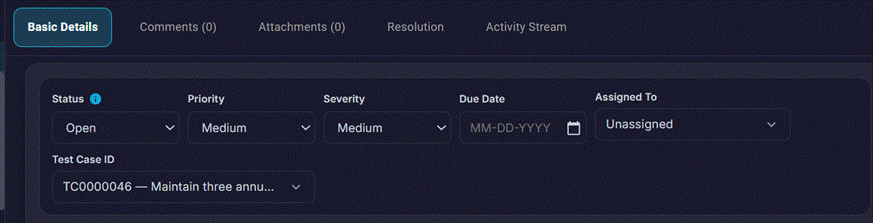
Basic Details tab
Contains all core fields for the defect:
- Title — editable short description.
- Description — rich-text editor for full defect details, steps to reproduce, and expected vs. actual behaviour. Supports text formatting, lists, tables, and inline images (paste directly from clipboard).
- Status — change the lifecycle status. Closing a defect may prompt for a resolution.
- Priority — Low, Medium, High, or Critical.
- Severity — Low, Medium, High, or Critical.
- Assigned To — the team member responsible for the fix.
- Test Case — the test case in which the defect was discovered.
- Due Date — the target date for resolution.
- Custom Fields — any additional fields configured by your administrator.
Tip: Save changes on the Basic Details tab using the Save button. Field changes are not auto-saved.
Comments tab
Team members can discuss the defect here. Comments support:
- Rich-text formatting.
- @mention — type @ followed by a name to notify a team member by Email
- File attachments per comment.
Attachments tab
Upload and manage supporting files for the defect — screenshots, log files, video recordings, or any other evidence. Supported file types include images, PDFs, Word documents, Excel files, and more. Files can also be pasted directly from the clipboard.
Resolution tab
Document how the defect was fixed. The resolution record includes:
- Resolution Comments — a rich-text description of the fix applied.
- AI-assisted generation — click the AI icon to have the system draft resolution notes based on the defect description and history. Review and edit before saving.
Note: If your project configuration makes the Resolution mandatory for closing, you must save a resolution before the status can be changed to Closed.
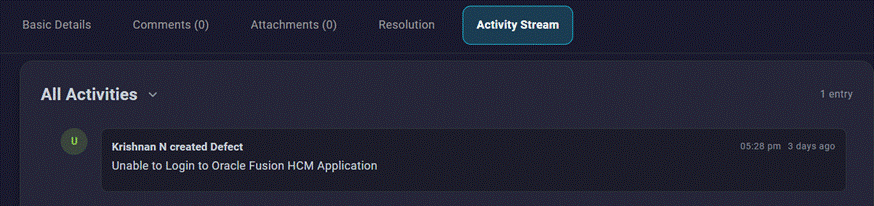
Activity Stream tab
A chronological log of every change made to the defect — field updates, status transitions, assignments, comments, and attachments — with timestamps and the name of the user who made each change.
7. Editing a Defect
Open the defect from the list and make changes on the Basic Details tab. You can update any field at any time (subject to your role permissions).
- Inline status changes are also possible directly from the list — click the status chip on a row to change it without opening the detail page.
- Inline assignee changes can be made from the list view using the assignee column.
Note: Some status transitions — for example, moving to Closed — may require confirmation or a resolution to be present. A dialog will prompt you if additional steps are needed.
8. Bulk Actions
Select multiple defects using the row checkboxes to perform actions on all of them at once.
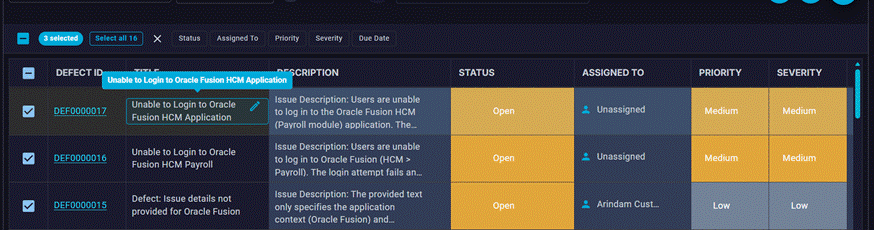
Selecting defects
- Use individual row checkboxes to select specific defects.
- Use the header checkbox to select all defects on the current page.
- Use Select All to select every defect matching your current filters — not just the current page.
Available bulk actions
| Action | What it does |
| Bulk Status Update | Change the status for all selected defects to a new value. |
| Bulk Priority Update | Set a new priority for all selected defects. |
| Bulk Severity Update | Set a new severity for all selected defects. |
| Bulk Assigned To | Assign all selected defects to a team member. |
| Bulk Due Date Update | Set a new due date for all selected defects. |
Note: Bulk status changes that require a resolution (e.g. closing defects) will prompt for confirmation. Defects without a resolution saved will not be closed.
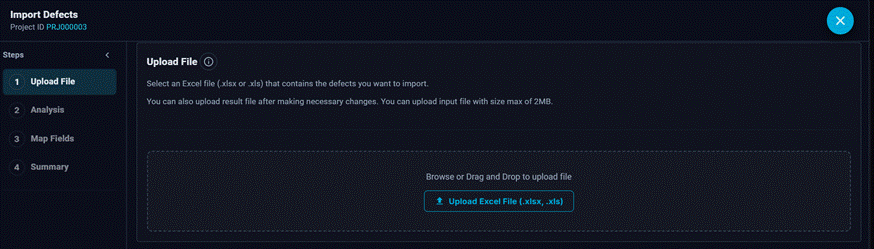
9. Import and Export
Importing defects
Use Import Defects to bring defect records into the project from an external source.
- Click Import Defects on the toolbar.
- Upload a ZIP file or Excel (.xlsx) file containing defect data.
- Map spreadsheet columns to SaaSMap fields (AI auto-maps most fields).
- Review the import summary — created, updated, skipped, and errors — then confirm.
Exporting defects
Use the Download button on the toolbar to export defects from the project.
- Download all defects — exports the complete defect list for the project.
- Download selected — exports only the defects you have checked.
10. Linking Defects to Test Cases and Requirements
Linking connects a defect to the artefact that revealed it, enabling full traceability across your project.
Link to a Test Case
On the Basic Details tab, use the Test Case field to search for and select the test case in which the defect was found. A single defect can be linked to one test case.
Link to a Requirement
On the Basic Details tab, use the Requirement field to link the defect to the requirement it violates or relates to. This allows you to trace from requirement through test case to defect.
Note: Test-execution-origin defects (logged from a failed step) are automatically linked to the test case that was being executed at the time.
11. AI Features
When AI is enabled for your tenant, two AI capabilities are available in the Defects module:
Create with AI
On the defect creation form, the AI tab allows the system to draft the title, description, and suggested steps to reproduce based on a short problem statement you provide. Review and adjust the draft before saving.
AI-assisted Resolution
On the Resolution tab of an existing defect, click the AI icon (sparkle button) to generate a draft set of resolution comments. The AI uses the defect’s description, status history, and linked test case context to suggest a resolution narrative. Edit the draft as needed before saving.
Note: AI features require the tenant-level AI setting to be enabled. If disabled, the AI tab and AI resolution button will not appear. Contact your administrator to enable AI.
12. Related Areas
| Area | How it relates to Defects |
| Test Cases | Defects are linked to the test cases in which they were discovered. |
| Test Cycles | Defects are logged during test execution within a Test Cycle. |
| Backlog / RTM | Defects can be linked to the requirements. |
| Phase | Defects may be associated with a project phase through their linked test case. |
| Project Dashboard | Shows defect counts, status breakdowns, and trend charts. |