Phase
User Guide
SaaSMap
1. Introduction
Phases in SaaSMap are time-boxed segments of a project that group related requirements and help teams plan, track, and deliver work in an organised sequence. Each Phase has a name, goal, Start and End dates, and a lifecycle status — giving project managers full visibility over what is being worked on and when.
This guide explains how to create, manage, and monitor Phases within a project. It is written for project managers, test managers, and team leads who plan and oversee delivery milestones.
What you can do with Phases
- View all phases for a project in a sortable, filterable table.
- View Streams and the Phases within them in a Project
- Create phases manually by entering the name, goal and dates.
- Generate phases automatically using AI from a project plan.
- Import requirements into a phase.
- Move requirements from one phase to another.
- Track progress within each phase — how many requirements are Not Started, In Progress, or Completed.
- Edit or delete phases as the plan evolves.
2. Accessing Phase
Phases are managed at project level.
- Sign in to SaaSMap and open Home.
- Select the project you are working on.
- In the project workspace, click the Phase tab.
Note: Everything on this tab applies only to the project you have open. If you do not have permission to view Phases, the tab may not be visible.
3. The Phase Screen
The Phase screen lists all phases for the current project in a table. Each row represents one phase. Rows can be clicked on to reveal the requirements assigned to that phase.
Columns
| Column | What it shows |
| Name | The name given to the phase when it was created. |
| Goal | A short description of what the phase aims to achieve. Click the eye icon to read the full goal text. |
| Start Date | The date the phase is scheduled to begin. |
| End Date | The date the phase is scheduled to finish. |
| Predecessor | The linked Phase that needs to be completed before moving to the current Phase. |
| Successor | The linked Phase that will be started after completing the current Phase. |
| % Completed | Depending on the Metric value selected – Build Status or Review Status, the percentage of work completed. |
| # Completed | Count of work items completed depending on the Metric value selected – Build Status or Review Status |
| # In Progress | Count of work items In Progress depending on the Metric value selected – Build Status or Review Status |
| # Total | Count of RTM’s or User Stories in the Phase |
| Status | Current status of the phase (e.g. Not Started, In Progress, Completed). |
| Actions (⋮) | Has the following action menu items View Phase Execution SummaryDelete |
Note: Some columns (Duration, Tag) are hidden by default. Use the column visibility selector on the toolbar to show them.
Toolbar controls
- + Add Phase — opens the form to create a new phase manually.
- Search — filters the list by phase name as you type.
- Show Completed — toggle to include or exclude phases whose status is Completed.
- Column Visibility — show or hide individual columns.
Add Phase screen
Viewing the requirement details
Click on the Phase name to reveal the requirements assigned to that phase. Each requirement shows its Req ID, Title, Description, current status etc. Use this view to quickly assess what is in scope for the phase and how far along it is.
Viewing Streams
Click on the “Swimlane View” to view the Streams and the Phases in each of them.
In this view, you get to see the Successor and Predecessor Phases for each of the Phases and their current Status and Progress.
4. Phase Status
Each phase moves through a lifecycle that reflects where it is in the delivery plan. The statuses below are the common set; your administrator may configure additional custom statuses.
| Status | Typical meaning |
| Not Started | The phase has been planned but work has not yet begun. |
| In Progress | Work on the requirements in this phase is actively under way. |
| Completed | All work in the phase is done and the phase is closed. Note that a Phase cannot be set to ‘Completed’ if any of the requirements have a review status of ‘Pending Review’ |
5. Creating a Phase
There are two ways to create a Phase in SaaSMap:
5.1 Manually
- Click + Add Phase on the toolbar.
- Fill in the phase details on the form (see fields below).
- Click Save to create the phase.
Phase form fields
| Field | Description |
| Phase Name | Required. A short, unique name for the phase (e.g. CRP1, UAT, Go Live). |
| Status | Set the initial lifecycle status. Defaults to Not Started. |
| Predecessor | The linked Phase that needs to be completed before moving to the current Phase. |
| Start Date | The planned start date for the phase. |
| End Date | The planned end date for the phase. |
| Tags | Any particular tags that need to be associated with the Phase |
| Goal | A free-text description of what the phase is intended to achieve. |
5.2 With AI — Generate from Plan
When a project plan has been uploaded or defined, you can ask the AI to suggest a complete set of phases based on the plan’s timeline and milestones.
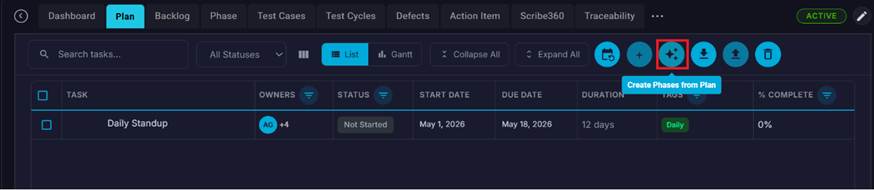
- Click the AI / Create Phases button on the Plan toolbar.
- The system analyses the plan and displays a suggested list of phases, each with a name, predecessor, start date, end date, and goal.
- Review the suggestions in the preview table. The AI shows a progress indicator while it works.
- Click Save Phases to create all the suggested phases in one action or close the dialog to discard.
Note: AI-generated phases inherit their dates and goals from the plan data. You can edit any phase individually after saving. Phases can only be generated if the project does not already have Phases created.
5.3 Copying requirements from a Predecessor Phase
After a phase is created, it can be edited and a Predecessor Phase selected.
Once a Predecessor Phase is selected, the application forces you to enter a new Phase Start Date and End Date. The Start date of the new Phase cannot be before the End Date of the Predecessor Phase. After filling out the details, clicking on the Save icon to save the changes. When you click on the Phase you get the following message.
To set the current Phase ‘In Progress’, the Predecessor Phase must be set as ‘Completed’. Click on the Green icon shown below to start the Phase.

When you click the Start icon, you see these options

These options allow you to select and copy a subset of the requirements from the Predecessor Phase based on set criteria. You can select the appropriate options and click on the ‘Start Phase’ button. You will see a message saying that the qualifying requirements were copied into the New Phase.
6. Editing a Phase
- On the Phases list, click the ⋮ (Options) menu on the phase row you want to change.
- Select Edit from the menu.
- Update any fields on the edit form.
- Click Save to apply the changes.
Execution Summary
Click on the document icon under the Actions column to view the AI generated Execution Summary for the Phase.
7. Deleting a Phase
- Click the ⋮ menu on the phase row.
- Select Delete.
- Confirm the deletion in the confirmation dialog.
Note: Deleting a phase does not delete the requirements assigned to it. Those requirements remain in the project’s backlog and can be reassigned to another phase
Only Phases that are in the status “Not Started” can be deleted.
8. Managing Requirements in a Phase
Requirements (user stories and RTM items) are the work items that live inside a phase. You can add, import, and move requirements using the actions below.
Click on the “Import from Backlog” icon to import requirements into a Phase.
Viewing requirements in a phase
Click the phase name to see the list of requirements assigned to it. Each requirement shows its ID, title, type, and status.
Generating test cases from phase requirements
You can trigger test-case generation for a requirement directly from the phase view. Expand the phase row, open the requirement’s options, and select Generate Test Cases. The system opens the test case generation wizard pre-filled with the requirement details.
9. Views
Phase details can be displayed in a List View or Kanban View, User has the option to select the list of columns to be viewed in the List view.
Kanban View
In this the user can switch between Build Status and Review Status and view the details.
User can click on the ‘Export Phase Requirements’ button and export them into an Excel document.
User can also select one or more requirements which are Build Complete and assign them for review.
A Phase can be reset (moved back to Not Started) if the Phase is in Progress and has no Test Cases generated and has no linked Test Cases.
10. Tracking Phase Progress
SaaSMap calculates progress for each phase based on the status of the requirements inside it.
| Indicator | What it represents |
| #Total | Total number of requirements assigned to the phase. |
| #Completed | Number of requirements whose status is Completed. |
| #In Progress | Number of requirements currently being worked on. |
| #Not Started | Number of requirements not yet started. |
| % Completed | Calculated as: Completed ÷ Total × 100. |
These counts update in real time as requirements are updated. The Project Dashboard also shows phase-level charts and comparisons — see the Dashboard section of this guide set for details.
11. Using Phases Across SaaSMap
Phases are referenced by several other features in the platform:
| Feature | How it uses Phases |
| Scribe360 FDD Agent | The Use Requirements button lets you pick requirements from an active phase to auto-fill a Functional Design Document. |
| Test Cycles | Test Cycles can be linked to a phase so that testing scope aligns with the delivery milestone. |
| RTM / Backlog | Requirements in the backlog show which phase they are assigned to, enabling traceability from requirement through test to phase. |
| Project Dashboard | Phase Analysis charts show planned vs. actual progress, requirement counts by phase, and completion trends. |
| Plan (AI) | An AI-generated project plan can be converted into a set of phases in one click. |
12. Related Areas
| Area | How it relates to Phases |
| Backlog / RTM | Source of requirements that are assigned to phases. |
| Test Cycles | Test execution milestones aligned to phase delivery. |
| Defects | Defects may be associated with requirements in a phase. |
| Project Plan | AI can generate phases automatically from an uploaded plan. |
| Project Dashboard | Real-time phase progress charts and executive summaries. |
| Scribe360 FDD Agent | Phase requirements used to auto-populate design documents. |